Hoy he tenido que desarrollar un nuevo componente, para un muy interesante proyecto que estamos empezando a desarrollar en Paradigma.
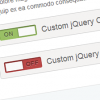
Este componte debe de mostrarse como una tabla, tal y como podéis ver en la siguiente imagen con el diseño creado por el artistazo @davidmontalvo, pero debe de actuar como un grupo de input tipo radio, ya que el usuario podrá seleccionar cada una de las celdas.

Para ello he optado por crear primero una estructura html que represente estos inputs:
<div id="radioGroupTable" class="fh">
	<div class="fg radioGroup">
		<?php for ($i = 0; $i < 5; $i++) { ?>
			<div class="options">
				<strong rel="Name" class="name fl">Option <?=$i?></strong>
				<div class="option">
					<input checked="true" type="radio" value="valor del input" name="name_<?=$i?>" id="test_<?=$i?>_1" class="radio">
					<label for="test_<?=$i?>_1">No access</label>
				</div>
				<div class="option">
					<input  type="radio" value="valor del input" name="name_<?=$i?>" id="test_<?=$i?>_2" class="radio">
					<label for="test_<?=$i?>_2">View</label>
				</div>
				<div class="option">
					<input type="radio" value="valor del input" name="name_<?=$i?>" id="test_<?=$i?>_3" class="radio">
					<label for="test_<?=$i?>_3">Edit</label>
				</div>
				<div class="option">
					<input type="radio" value="valor del input" name="name_<?=$i?>" id="test_<?=$i?>_4" class="radio">
					<label for="test_<?=$i?>_4">Admin</label>
				</div>
			</div>
		<?php } ?>
	</div>
</div>
De este modo, aunque nuestro usuario no tenga activado el Javascript, el componente continuará funcionando.
Una vez que tenemos la estructura HTML, procedemos a transformarlo en una tabla por medio de Javascript:
function createradioGroupTable () {
	var wrap = $('#radioGroupTable'),
		radioGroup = wrap.find('.radioGroup').first(),
		options = radioGroup.find('.options'),
		tableHtml = '';

	radioGroup.hide();

	// create table header
	options.first().each(function() {
		tableHtml = "<table class='radioGroupTable'><thead><tr>";

		var row = $(this),
			name = row.find('.name').first().attr('rel');

		tableHtml += '<th class="name">'+name+'</th>';

		row.find('.option').each(function () {
			var label = $(this).find('label').first().html();
			tableHtml += '<th class="label">'+label+'</th>';
		});

		tableHtml += "</tr></thead><tbody>";
	});

	// create each table row
	options.each(function() {
		tableHtml += "<tr>";

		var row = $(this),
			name = row.find('.name').first().html();

		tableHtml += '<td class="name">'+name+'</td>';

		row.find('.option').each(function () {
			var id = $(this).find('input').first().attr('id');
			tableHtml += '<td class="label"><a href="#" rel="'+id+'"><em class="sp indent">'+id+'</em></a></td>';
		});

		tableHtml += "</tr>";
	});

	tableHtml += "</tbody></table>";

	wrap.append(tableHtml);
	setRadioGroupTable(wrap);
}
y una vez creada la tabla, le asignamos los comportamientos deseados para que el usuario pueda editar los valores.
function setRadioGroupTable(wrap) {

	wrap.find('a').click(function (e){
		e.preventDefault();

		var link = $(this),
			cell = link.parent('td'),
			row = cell.parent('tr');

		// remove previus status
		row.find('td.label').removeClass('selected active');

		// set new cells status
		cell.addClass('selected active');

		cell.prevAll('td.label').addClass('active');
		//console.log(cell.prevAll('td.label'));

		wrap.find('input#'+link.attr('rel')).click();
	});

	wrap.find('a').hover(function () {
		var cell = $(this).parent('td');

		cell.addClass('hover')
			.prevAll('td.label').addClass('hover');
	}, function () {
		var cell = $(this).parent('td');

		cell.removeClass('hover')
			.prevAll('td.label').removeClass('hover');

	})

	// set init table status
	wrap.find('input:checked').each(function (){4
		wrap.find('a[rel="'+$(this).attr('id')+'"]').click();
	});

}
Evidentemente para que todo esto funcione debemos de llamar a estas funciones en el momento que jQuery este listo:
$(function (){
	createradioGroupTable();
})
Y por último le aplicamos algunos estilos CSS
table.radioGroupTable {

}
	table.radioGroupTable .label {
		width:87px;
		padding:1px;
	}
	table.radioGroupTable a {
		display:block;
		height:38px;
		outline: none;
		text-align: center;
	}
		table.radioGroupTable a .sp {
			float: none;
			display: inline-block;
			margin-top:11px;
			opacity: 0;
		}
	table.radioGroupTable td.active a {
		background-color:#d2f3fa;
	}
		table.radioGroupTable td:nth-child(2).active a {
			background-color: #d2f3fa;
		}
		table.radioGroupTable td:nth-child(3).active a {
			background-color: #baeefc;
		}
		table.radioGroupTable td:nth-child(4).active a {
			background-color: #76e2fe;
		}
		table.radioGroupTable td:nth-child(5).active a {
			background-color: #00ccff;
		}
	table.radioGroupTable td.selected a em {
		background-position:-142px -144px;
		opacity: 1;
	}
	table.radioGroupTable tr:hover td.active a {
		background-color: transparent;
	}
	table.radioGroupTable tr:hover td.hover a {
		background-color:#d2f3fa;
	}
El resultado lo podeis ver en esta página de demo
También te puede interesar:
-
jQuery Event Calendar Plugin – english version
junio 5th, 2012jQuery Event Calendar Plugin – english version
junio 5th, 2012 -
Mantener elementos siempre visibles
julio 17th, 2012Mantener elementos siempre visibles
julio 17th, 2012 -
Mensaje de alerta si abandonas un formulario sin salvar
agosto 28th, 2012Mensaje de alerta si abandonas un formulario sin salvar
agosto 28th, 2012